chapter 3(vue结构)
.vue单文件组件结构
Template:
此HTML代码块呈现组件的UI视图。它应该只在最高级别元素的每个组件上出现一次。
Script:
此JavaScript代码块包含组件的主要逻辑,每个组件文件最多只显示一次。使用TypeScript的提示你应该将TypeScript的lang=“ts”属性添加到
Style:
此CSS代码块包含组件的样式。它是可选的,可以根据每个组件文件的需要出现多次。
<template>
<h2 class="heading">I am a a Vue component</h2>
</template>
<script lang="ts">
export default {
name: 'MyFistComponent',
};
</script>
<style>
.heading {
font-size: 16px;
}
</style>
该示例是名为MyFirstComponent的Vue组件的SFC文件结构示例。
由于.vue文件格式是一种独特的扩展标准,您需要使用特殊的构建工具(编译器/转译器),如Webpack、Rollup等,将相关文件预编译为适当的JavaScript和CSS,以便在浏览器端提供服务。在Vite创建新项目时,Vite已经将这些工具设置为脚手架过程的一部分。然后,您可以将组件作为ES模块导入,并将其声明为内部组件以在其他组件文件中使用。以下是一个导入位于components目录中的MyFirstComponent以在App.vue组件中使用的示例:
<script lang="ts">
import MyFirstComponent from './components/MyFirstComponent.vue';
export default {
components: {
MyFirstComponent,
}
}
</script>
<template>
<my-first-component />
<MyFirstComponent />
</template>
defineComponent()
defineComponent()方法是一个包装函数,它接受一个配置对象,并通过定义组件的类型推理返回相同的结果。defineComponent()方法仅在Vue 3.x及以后版本中可用,并且仅在需要TypeScript时才相关。
如果您使用VSCode作为IDE,并安装了Volar扩展,当您将鼠标悬停在模板部分的消息上时,您将看到消息类型为字符串,如图所示:
<template>
<h2 class="heading">{{ message }}</h2>
</template>
<script lang="ts">
import { defineComponent } from 'vue';
export default defineComponent({
    name: 'MyMessageComponent',
    data() {
        return {
            message: 'Welcome to Vue 3!'
        }
    }
});
</script>
1. 基本用法
defineComponent 是一个高阶函数,它接受一个对象作为参数,该对象包含组件的选项(如 data、methods、computed、props 等),并返回一个组件构造函数。
示例
import { defineComponent } from 'vue'

export default defineComponent({
  data() {
    return {
      message: 'Hello, Vue 3!'
    }
  },
  methods: {
    greet() {
      alert(this.message)
    }
  }
})
2. 类型推断
使用 defineComponent 可以获得更好的 TypeScript 类型推断。Vue 3 的类型系统可以更好地理解组件的选项,并提供更准确的类型检查和自动补全。
示例
import { defineComponent } from 'vue'

export default defineComponent({
  props: {
    title: {
      type: String,
      required: true
    }
  },
  data() {
    return {
      message: 'Hello, Vue 3!'
    }
  },
  methods: {
    greet() {
      alert(this.message + ' ' + this.title)
    }
  }
})
在这个示例中,TypeScript 会自动推断 title 是一个字符串,并且在 greet 方法中使用 this.title 时会提供类型检查。
3. 与 script setup 的关系
在 <script setup> 语法中,defineComponent 并不是必需的,因为 <script setup> 本身已经提供了更好的类型推断和简洁的语法。但是,如果你需要在一个普通的 <script> 标签中定义组件,defineComponent 是非常有用的。
4. 与 setup 函数的关系
defineComponent 可以与 setup 函数一起使用,以提供更复杂的逻辑和更好的类型支持。
示例
import { defineComponent, ref } from 'vue'

export default defineComponent({
  setup() {
    const message = ref('Hello, Vue 3!')

    const greet = () => {
      alert(message.value)
    }

    return {
      message,
      greet
    }
  }
})在这个示例中,setup 函数返回的对象中的属性和方法可以在模板中直接使用,并且 TypeScript 会提供类型检查。
组件生命周期挂钩
Vue组件的生命周期从Vue实例化组件开始,到销毁组件实例(或卸载)结束。Vue将组件的生命周期划分为几个阶段,以下是一个简化的 Vue 3 组件生命周期图示:
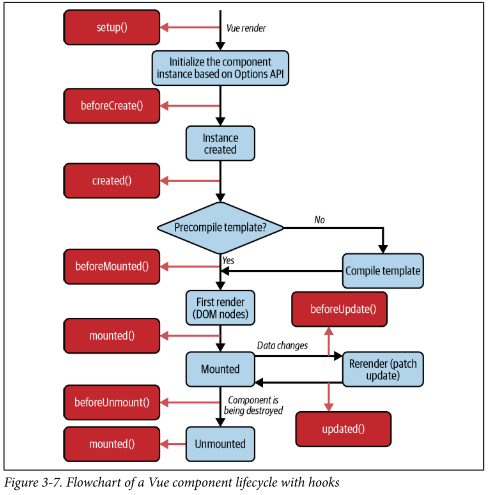
1.setup
setup是组件生命周期开始前的第一个事件挂钩。这个钩子在Vue实例化组件之前运行一次。在此阶段,不存在组件实例;因此无法访问.
1. setup 的执行时机
- 执行时机:
setup在组件实例创建之前执行,即在beforeCreate之前。 - 上下文: 在
setup中,this不指向组件实例,因此不能直接访问data、methods、computed等。
2.setup 函数接收两个参数:
props: 组件的 props。context: 包含attrs、slots、emit和expose等上下文对象。
3.使用组合式 API
setup 与组合式 API(如 ref、reactive、computed、watch 等)结合使用,可以更灵活地组织和重用逻辑。
4. 与 <script setup> 的关系
<script setup>是 Vue 3 中的一种语法糖,用于简化 setup 函数的使用。它允许你在
2.beforeCreate
- 调用时机: 在实例初始化之后,数据观测 (data observer) 和 event/watcher 事件配置之前被调用。
- 用途: 通常在这个阶段,组件的数据和方法还未初始化,因此不能访问
data、methods、computed等。
3.created
- 调用时机: 在实例创建完成后被调用,此时实例已完成数据观测 (data observer)、属性和方法的运算,但尚未挂载到 DOM。
- 用途: 可以在这个阶段进行数据初始化、事件监听、API 请求等操作。
4.beforeMount
- 调用时机: 在挂载开始之前被调用,相关的
render函数首次被调用。 - 用途: 可以在这个阶段进行一些最后的准备工作,但此时 DOM 还未生成。
5.mounted
- 调用时机: 在挂载完成后被调用,此时组件已经被插入到 DOM 中。
- 用途: 可以在这个阶段进行 DOM 操作、第三方库初始化等。
6.beforeUpdate
- 调用时机: 在数据更新导致的虚拟 DOM 重新渲染和打补丁之前被调用。
- 用途: 可以在这个阶段进行一些更新前的准备工作,但此时 DOM 还未更新。
7.updated
- 调用时机: 在数据更新导致的虚拟 DOM 重新渲染和打补丁之后被调用。
- 用途: 可以在这个阶段进行 DOM 操作,响应数据的变化。
8.beforeUnmount
- 调用时机: 在卸载组件实例之前被调用。
- 用途: 可以在这个阶段进行一些清理工作,比如清除定时器、取消事件监听等。
9.unmounted
- 调用时机: 在卸载组件实例之后被调用。
- 用途: 可以在这个阶段进行最后的清理工作,确保组件不会留下任何副作用。
<template>
<h2 class="heading">I am {{message}}</h2>
<input v-model="message" type="text" placeholder="Enter your name" />
</template>
<script lang="ts">
import { defineComponent } from 'vue'
export default defineComponent({
name: 'MyFistComponent',
data() {
return {
message: ''
}
},
setup() {
console.log('setup hook triggered!')
return {}
},
beforeCreate() {
console.log('beforeCreate hook triggered!')
},
created() {
console.log('created hook triggered!')
},
beforeMount() {
console.log('beforeMount hook triggered!')
},
mounted() {
console.log('mounted hook triggered!')
},
beforeUpdate() {
console.log('beforeUpdate hook triggered!')
},
updated() {
console.log('updated hook triggered!')
},
beforeUnmount() {
console.log('beforeUnmount hook triggered!')
},
});
</script>
methods
在 Vue.js 中,methods 是一个对象,用于定义组件中的方法。这些方法可以在组件的模板中通过事件绑定或其他方式调用。
详细解释
定义 methods
在 Vue 2 中,methods 通常在 export default 对象中定义:
<template>
  <div>
    <h1>{{ message }}</h1>
    <button @click="increment">Increment</button>
  </div>
</template>

<script>
export default {
  data() {
    return {
      message: 'Hello, Vue 3!',
      count: 0
    }
  },
  methods: {
    increment() {
      this.count++
      this.message = `Count is ${this.count}`
    }
  }
}
</script>
在 Vue 3 中,使用 <script setup> 语法时,直接定义方法即可:
<template>
  <div>
    <h1>{{ message }}</h1>
    <button @click="increment">Increment</button>
  </div>
</template>

<script setup lang="ts">
import { ref } from 'vue'

const message = ref('Hello, Vue 3!')
const count = ref(0)

const increment = () => {
  count.value++
  message.value = `Count is ${count.value}`
}
</script>
方法的作用
- 事件处理: 处理用户交互事件,如点击按钮、输入文本等。
- 数据操作: 修改组件的数据,触发视图更新。
- 逻辑封装: 封装复杂的逻辑,提高代码的可读性和可维护性。
Computed
在 Vue.js 中,computed 属性用于定义计算属性。计算属性是基于它们的依赖进行缓存的,只有当依赖发生变化时才会重新计算。这使得计算属性非常适合用于处理需要根据其他数据动态计算的值。
计算属性在 Vue 组件中通过 computed 对象定义。在 Vue 2 中,computed 通常在 export default 对象中定义;在 Vue 3 中,可以使用 <script setup> 语法直接定义。
详细解释
定义 computed 属性
在 Vue 2 中,computed 通常在 export default 对象中定义:
<template>
  <div>
    <h1>{{ fullName }}</h1>
    <p>First Name: <input v-model="firstName" type="text" /></p>
    <p>Last Name: <input v-model="lastName" type="text" /></p>
  </div>
</template>

<script>
export default {
  data() {
    return {
      firstName: 'John',
      lastName: 'Doe'
    }
  },
  computed: {
    fullName() {
      return `${this.firstName} ${this.lastName}`
    }
  }
}
</script>
在 Vue 3 中,使用 <script setup> 语法时,直接定义计算属性即可:
<template>
  <div>
    <h1>{{ fullName }}</h1>
    <p>First Name: <input v-model="firstName" type="text" /></p>
    <p>Last Name: <input v-model="lastName" type="text" /></p>
  </div>
</template>

<script setup lang="ts">
import { ref, computed } from 'vue'

const firstName = ref('John')
const lastName = ref('Doe')

const fullName = computed(() => {
  return `${firstName.value} ${lastName.value}`
})
</script>
计算属性的特点
- 缓存: 计算属性会缓存其结果,只有当依赖的数据发生变化时才会重新计算。这提高了性能,特别是在依赖的数据没有变化时。
- 响应式: 计算属性依赖的数据发生变化时,计算属性会自动重新计算并更新视图。
- 只读: 默认情况下,计算属性是只读的。如果需要可写的计算属性,可以定义
get和set方法。
Watchers
监视器允许您以编程方式监视组件的任何反应性数据属性的变化并对其进行处理。每个观察者都是一个接收两个参数的函数:观察数据的新值(newValue)和当前值(oldValue)。然后,它根据这两个输入参数执行任何逻辑。我们通过将响应式数据添加到组件选项的watch属性字段中来定义一个观察者,遵循以下语法:
watch: {
    'reactiveDataPropertyName'(newValue, oldValue) {
    // do something
    }
}
在 Vue 3 中,watch 是一个用于监听响应式数据变化的 API。当被监听的数据发生变化时,watch 会执行相应的回调函数。这对于响应式数据的处理和副作用管理非常有用。以下是关于 watch 的详细解释:
基本用法
watch(source, callback, options?)- source: 要监听的数据源,可以是响应式对象、计算属性、普通对象、数组、函数等。
- callback: 当
source发生变化时执行的回调函数。回调函数接收两个参数:新值和旧值。 - options: 可选配置项,用于控制
watch的行为,例如immediate、deep等。
示例
监听单个响应式数据
import { ref, watch } from 'vue'

const count = ref(0)

watch(count, (newVal, oldVal) => {
  console.log(`count changed from ${oldVal} to ${newVal}`)
})
配置选项
- immediate: 立即执行一次回调函数。
  watch(count, (newVal, oldVal) => {
    console.log(`count changed from ${oldVal} to ${newVal}`)
}, { immediate: true })- 示例:
import { ref, watch } from 'vue' const count = ref(0) watch(count, (newVal, oldVal) => { console.log(`count changed from ${oldVal} to ${newVal}`) }, { immediate: true })解释: 当count初始化时,回调函数会立即执行一次,输出count changed from undefined to 0。 - deep: 深度监听对象的变化。当对象的任何嵌套属性发生变化时,都会触发回调函数。
  watch(user, (newVal, oldVal) => {
    console.log('user changed:', newVal, oldVal)
}, { deep: true })示例:
  import { ref, watch } from 'vue'

  const user = ref({
    name: 'John',
    age: 30
  })

  watch(user, (newVal, oldVal) => {
    console.log('user changed:', newVal, oldVal)
}, { deep: true })解释: 当 user 对象的任何属性(如 name 或 age)发生变化时,回调函数会被触发。
- flush: 控制回调函数的执行时机,可选值为
'pre'、'post'、'sync'。 - 可选值:
'pre': 在响应式系统更新之前执行回调函数。'post': 在响应式系统更新之后执行回调函数(默认值)。'sync': 在响应式系统更新时同步执行回调函数。
- 示例:
watch(count, (newVal, oldVal) => { console.log(`count changed from ${oldVal} to ${newVal}`) }, { flush: 'post' })import { ref, watch } from 'vue' const count = ref(0) watch(count, (newVal, oldVal) => { console.log(`count changed from ${oldVal} to ${newVal}`) }, { flush: 'pre' })解释: 当count发生变化时,回调函数会在响应式系统更新之前执行。
slot插槽
在 Vue.js 中,插槽(Slots)是一种强大的内容分发机制,允许你在组件中定义可替换的内容区域。插槽使得组件更加灵活和可复用。
插槽(Slots)是 Vue 提供的一种内容分发机制,允许你在组件的模板中定义一个或多个插槽,这些插槽可以被父组件填充内容。通过插槽,父组件可以向子组件传递自定义内容,从而实现更灵活的组件组合和复用。
类型
Vue 支持三种主要类型的插槽:
- 默认插槽(Default Slot)
- 具名插槽(Named Slots)
- 作用域插槽(Scoped Slots)
1. 默认插槽(Default Slot)
作用: 默认插槽用于接收父组件传递的默认内容。
示例:
子组件 (MyComponent.vue):
<template>
  <div class="container">
    <header>Header</header>
    <main>
      <slot></slot> <!-- 默认插槽 -->
    </main>
    <footer>Footer</footer>
  </div>
</template>父组件:
<template>
  <MyComponent>
    <p>这是默认插槽的内容</p>
  </MyComponent>
</template>解释: 父组件传递的 <p> 标签内容会被插入到子组件的默认插槽位置。
2. 具名插槽(Named Slots)
作用: 具名插槽允许你在子组件中定义多个插槽,并通过名称来区分和填充这些插槽。
示例:
子组件 (MyComponent.vue):
<template>
  <div class="container">
    <header>
      <slot name="header"></slot> <!-- 具名插槽 -->
    </header>
    <main>
      <slot></slot> <!-- 默认插槽 -->
    </main>
    <footer>
      <slot name="footer"></slot> <!-- 具名插槽 -->
    </footer>
  </div>
</template>父组件:
<template>
  <MyComponent>
    <template v-slot:header>
      <h1>这是头部内容</h1>
    </template>
    <p>这是默认插槽的内容</p>
    <template v-slot:footer>
      <p>这是底部内容</p>
    </template>
  </MyComponent>
</template>简写形式:
<template>
  <MyComponent>
    <template #header>
      <h1>这是头部内容</h1>
    </template>
    <p>这是默认插槽的内容</p>
    <template #footer>
      <p>这是底部内容</p>
    </template>
  </MyComponent>
</template>解释: 父组件通过 v-slot 指令(或简写 #)为子组件的不同插槽传递内容。
3. 作用域插槽(Scoped Slots)
作用: 作用域插槽允许子组件向父组件传递数据,父组件可以根据这些数据来渲染内容。
示例:
子组件 (MyComponent.vue):
<template>
  <div class="container">
    <header>
      <slot name="header"></slot> <!-- 具名插槽 -->
    </header>
    <main>
      <slot :item="item" :index="index"></slot> <!-- 作用域插槽 -->
    </main>
    <footer>
      <slot name="footer"></slot> <!-- 具名插槽 -->
    </footer>
  </div>
</template>

<script setup>
import { ref } from 'vue'

const item = ref('示例项目')
const index = ref(1)
</script>父组件:
<template>
  <MyComponent>
    <template #header>
      <h1>这是头部内容</h1>
    </template>
    <template #default="slotProps">
      <p>项目名称: {{ slotProps.item }}</p>
      <p>项目索引: {{ slotProps.index }}</p>
    </template>
    <!--简写形式:
    <template #default="{ item, index }">
      <p>项目名称: {{ item }}</p>
      <p>项目索引: {{ index }}</p>
    </template> -->
    <template #footer>
      <p>这是底部内容</p>
    </template>
  </MyComponent>
</template>
ref
在 Vue.js 中,refs 是一种用于直接访问 DOM 元素或子组件实例的机制。通过 refs,你可以在 Vue 组件中获取对特定元素或组件的引用,从而进行操作或获取信息。以下是关于 refs 的详细解释:
基本概念
refs(References)允许你在 Vue 组件中直接访问 DOM 元素或子组件实例。这在需要直接操作 DOM 或调用子组件的方法时非常有用。
使用场景
- 直接操作 DOM 元素:例如,获取输入框的值、设置焦点、操作样式等。
- 调用子组件的方法:例如,调用子组件的某个方法来执行特定操作。
- 访问子组件的属性:例如,获取子组件的某个属性值。
基本用法
1. 访问 DOM 元素
子组件 (MyComponent.vue):
<template>
  <div>
    <input ref="inputRef" type="text" placeholder="输入一些内容" />
    <button @click="focusInput">聚焦输入框</button>
  </div>
</template>

<script setup>
import { ref } from 'vue'

const inputRef = ref(null)

const focusInput = () => {
  if (inputRef.value) {
    inputRef.value.focus()
  }
}
</script>
2. 访问子组件实例
子组件 (ChildComponent.vue):
<template>
  <div>
    <p>子组件内容</p>
  </div>
</template>

<script setup>
import { defineExpose } from 'vue'

const childMethod = () => {
  console.log('子组件的方法被调用了')
}

// 暴露方法给父组件
defineExpose({
  childMethod
})
</script>父组件:
<template>
  <div>
    <ChildComponent ref="childRef" />
    <button @click="callChildMethod">调用子组件方法</button>
  </div>
</template>

<script setup>
import { ref } from 'vue'
import ChildComponent from './ChildComponent.vue'

const childRef = ref(null)

const callChildMethod = () => {
  if (childRef.value) {
    childRef.value.childMethod()
  }
}
</script>
mixins
在 Vue.js 中,Mixins 是一种分发 Vue 组件中可复用功能的灵活方式。Mixins 允许你将一组选项(如数据、方法、生命周期钩子等)提取到一个独立的对象中,然后将这些选项混入到多个组件中。这样可以避免代码重复,提高代码的可维护性和复用性(vue3中很少使用)。但是,太多的mixin会使其他开发人员在理解和调试方面感到困惑,并且在大多数情况下,被认为是不好的做法。
基本概念
Mixins 是一个包含 Vue 组件选项的对象。当你将一个 Mixin 混入到组件中时,Mixin 中的选项会被合并到组件的选项中。如果组件和 Mixin 中有相同的选项,Vue 会根据一定的规则进行合并。
使用场景
- 代码复用: 将常用的逻辑(如数据获取、事件处理等)提取到 Mixin 中,多个组件可以复用这些逻辑。
- 功能增强: 通过 Mixin 增强组件的功能,而不需要修改组件的代码。
- 模块化: 将复杂的组件拆分为多个 Mixin,提高代码的可读性和可维护性。
基本用法
1. 定义 Mixin
首先,定义一个 Mixin 对象,包含你希望复用的选项。
示例 Mixin (myMixin.js):
export const myMixin = {
  data() {
    return {
      sharedData: '这是共享的数据'
    }
  },
  methods: {
    sharedMethod() {
      console.log('这是共享的方法')
    }
  },
  created() {
    console.log('Mixin created')
  }
}
2. 混入 Mixin 到组件
在组件中使用 mixins 选项来混入定义好的 Mixin。
示例组件 (MyComponent.vue):
<template>
  <div>
    <p>{{ sharedData }}</p>
    <button @click="sharedMethod">调用共享方法</button>
  </div>
</template>

<script>
import { myMixin } from './myMixin'

export default {
  mixins: [myMixin],
  data() {
    return {
      componentData: '这是组件的数据'
    }
  },
  created() {
    console.log('组件 created')
  }
}
</script>输出:
Mixin created
组件 created
sharedData 的值为: 这是组件的数据